Lucy Jane Art Assignment Three
"Video Intro To Charcoal Drawing"
"A Grand Expression Of
Graphite Art"
1)
LESSON ONE: Lucy to go
over the teaching and video with mom together. Mom is a partner in
Lucy's learning process. Mom to supervise & help with reading &
studying the following material in this lesson. Student is to
actually try each technique to determine best method before starting
a project. Initially use inexpensive paper to test out each pencil
grip method. Lucy should memorize what method name she is using on
each of the art works. (example: if she used the #3 paint brush
grip, or any combination of grips, she should know it when asked)
Mainly... mom to read with student and become familiar with charcoal
drawing methods to assure student has tried each method for
discovery & exploration.
EASY WAYS TO DRAW IN CHARCOAL
What is Charcoal and How to Draw with Charcoal?
Technically speaking, charcoal is burnt organic material. Usually
the material is wood. There are a few types of charcoal used by
artists to create a drawing. These types of charcoal include "vine"
and "compressed".
Vine charcoal usually consists of burnt willow wood. Vine
charcoal is easily spread on a surface and is very easy to erase. As
a consequence, it is generally makes a lighter mark when you draw
than compressed charcoal and easily smudges. (This may be a
benefit.)
The Charcoal Art Kit
Compressed charcoal is held together by a gum binder and is
darker than vine charcoal. As a result, it is harder to erase,
harder to smudge, but makes a darker mark. Compressed charcoal may
come as a round stick, a square stick, or in a pencil. (Vine
charcoal is almost always a round stick.) Some compressed charcoal
is pigmented. This is the case with white compressed charcoal.
Tools for Drawing with Charcoal
When using charcoal to draw, a few tools will need to be at your
disposal. First, you may need a variety of different types of
charcoal- vine, compressed, pencil form. You will also want to have
a kneaded eraser.
IMPORTANT NOTE:
Lucy shall expand with experience. Please proceed with only the
current supplies on hand. If the assignment is a success, Lucy may
make a list of needed supplies after this assignment is completed.

Kneaded Eraser
- A kneaded eraser is a special type of
eraser that is designed to lift the material off of the surface.
Kneaded erasers work especially well with charcoal.
Blending Stumps
- You may also want to have a blending
stump. A blending stump will allow you to have full control over the
blending and smearing of the charcoal. You can create a blending
stump by tightly rolling up drawing paper to a point.
CAUTION IMPORTANT:
If you are drawing on a flat surface, it's also a good idea to have
a paper towel handy. You can lay the paper towel between your hand
and the surface of the drawing, so that your hand doesn't smear your
work.

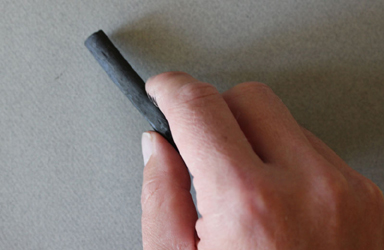
Tips for Holding The Charcoal
Vine charcoal and compressed sticks should be held differently in
your hand than a drawing pencil. It will vary from artist to artist,
but my suggestion is to hold the charcoal with your thumb and
forefinger with your palm facing the surface of the paper.
This allows you to make marks using your shoulder and elbow
instead of with just your wrist.
For detailed marks, a charcoal pencil can be used and held just
like a traditional pencil.
5 Grips for Holding a Pencil for Drawing
Understand the importance of drawing with different grips. Once
you are open to holding the pencil in different positions, your
drawing may be greatly improved.
It’s no secret that the way in which you hold your drawing pencil
will affect the marks that you make on the drawing surface. By
holding the pencil the same way – all of the time – in all of your
drawings – you are limiting what is possible as far as mark-making
goes.
It’s also no secret that variety is an important factor in our
drawings. Variety, one of the eight principles of art, creates
interest in our drawings. It keeps us exploring the picture plane
and makes our viewers more engaged in what we produce. In fact,
Plato even acknowledged the importance of variety in artistic
composition.
By holding the pencil in different ways, we can instantly create
variety in our drawings. Beyond this however, expanding the
possibilities of how the pencil is held will lead to new ways of
making marks, expanding our drawing possibilities.
So, let’s look at a few ways that you can hold your pencil to
create different marks in your drawing…
Pencil Grip #1 – Traditional

The traditional grip is exactly what the title suggests. This is
the way that most of us have learned how to grip a pencil from the
time we first started learning how to write. For many people, this
is the only grip that is used for drawing. I’ll admit, this is still
my "go to" grip. When I sit down to draw something, I’ll usually
hold the pencil with this grip initially. It’s just natural to grab
a pencil in the way that we are most familiar. But using this grip
only limits what we can do with our drawings. The tip of the pencil
is what makes contact with the surface. There is quite a lot of
control with this grip, which makes it great for details.
2)
LESSON
TWO TRADITIONAL GRIP:
Lucy to draw a simple creative idea of her choosing, utilizing
only pencil grip #1
traditional. It could be a simple sample only; or whatever idea to
demonstrate understanding of various pencil grips.. Be sure to mark
the paper with Pencil Grip #1 for later review and grading.
Pencil Grip # 2 – The Drumstick Grip (My
Favorite)

Now this grip is favorite for a couple of reasons. It’s not the
grip that I use most often, but it’s one that encourages better
drawing. More on that in a moment. I’m calling this grip "The
Drumstick Grip". This grip is very similar to how one should hold a
drumstick. The pencil is held loosely between the index finger and
the thumb, while the other fingers act to stabilize the pencil.
Holding the pencil in this manner allows for the marks to originate
from side of the exposed graphite (or charcoal, or colored pencil),
instead of the just the tip.
Now, why is this grip a favorite? This grip forces you
to draw with your shoulder instead of just your wrist. This is
essential to "loosening up" with your drawing, which will actually
lead to better drawing. This grip is perfect for loose marks and
laying out drawing for this very reason. For drawing large, this
grip is – by far, one of the best. You can also create the greatest
variety of marks using this grip as well.
3)
LESSON THREE DRUMSTICK GRIP:
Lucy to draw a simple creative idea of her choosing, utilizing
only DRUM STICK pencil
grip. Do not use any other grip on this sample. Be sure to mark the
paper with Pencil Grip name & number for later review & grading.
Grip #3 – The Paint Brush Grip

With the "paint brush" grip, the pencil is held in a similar
manner to holding a paint brush. The pencil is held upright and the
back edge rests on the crease between your index finger and the base
of your thumb. This grip is perfect for creating light and delicate
marks. It’s also great for when you are making visual comparisons on
the surface and laying out the composition. Generally the tip of the
pencil is what makes contact on the drawing surface.
4)
LESSON FOUR PAINT BRUSH GRIP:
Lucy to draw a simple creative idea of her choosing, utilizing
only PAINT BRUSH
pencil grip. Do not use any other grip on this sample. Be sure to
mark the paper with Pencil Grip name & number for later review &
grading.
Grip #4 – Tip Heavy Overhand Grip

This grip is used for forceful applications of the material onto
the surface. The midsection of the pencil is held between the middle
finger and the thumb while pressure is exerted onto the tip of the
pencil. The pencil lays almost parallel to the drawing surface,
forcing the side of the tip of the pencil to make contact. The
result is a strong mark that has potential for width variance. This
grip is great for filling in large areas of the medium quickly. This
grip also forces the use of the shoulder in the drawing process.
5)
LESSON FIVE TIP HEAVY OVERHAND GRIP:
Lucy to draw a simple creative idea of her choosing, utilizing
only TIP HEAVY
OVERHAND pencil grip. Do not use any other grip on this sample. Be
sure to mark the paper with Pencil Grip name & number for later
review & grading.
Grip #5 – The Inverted Grip
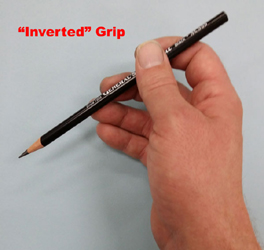
For this grip, the pencil is held by resting it upon the
forefinger and stabilizing it with the thumb and lower fingers. The
pencil should actually point back towards the artist. Marks are made
with the tip and the backside of the tip of the pencil. This grip
allows the artist to clearly see the marks as they are made since
the hand and the fingers are out of the way.
6)
LESSON SIX THE INVERTED GRIP:
Lucy to draw a simple creative idea of her choosing, utilizing
only THE INVERTED
pencil grip. Do not use any other grip on this sample. Be sure to
mark the paper with Pencil Grip name & number for later review &
grading.
IMPORTANT NOTE:
Before proceeding, lessons two through six should have produced 5
separate samples with only the one grip which should be marked on
each drawing sketch. These 5 sketch drawings are to be turned in to
Music And Art For Youth.
Take Action
Which grip will you use most? Will you get stuck with a
particular approach? It’s time to take action and start
experimenting with different pencil grips. By trying out a few of
these grips, you’ll start to see some improvement. It may feel a bit
strange at first, but with a touch of practice you’ll start seeing
the benefits of using ALL these grips in your drawings.
It is important to keep an open mind in this learning process.
7)
LESSON SEVEN "START 3 REAL CHARCOAL
DRAWINGS": Use three creative ideas of her choosing,
utilizing ALL pencil grips methods in each of her drawings. The
charcoal drawings will be reviewed & graded. The drawings should be
on high quality paper, fit to be framed. The subject matter should
fill the paper area but leave 1 inch from the edge to allow
professional framing later. Lucy Jane's signature should be clear,
small, in the lower right, and non- obtrusive.
CAUTION: Be very
careful of smearing with charcoal. Protect your paintings carefully,
especially while drawing, and in storing & transport.
a)
The Animal World Charcoal Drawing
b)
The Plant World Charcoal Drawing
c)
The People World Charcoal Drawing
8)
LESSON EIGHT: Essay about this first
experience in Charcoal Drawing: The essay must be
400 words or less, but no less than 100 words. Address the following
in the essay:
a) What I like about Charcoal drawing
b) What I plan for future Charcoal Drawings
c) What is different about Charcoal Drawings
compared to my paintings
d) How Charcoal Painting Fits In My Plan as a
visual artist and why
e) What kinds of things I need to improve in my
charcoal paintings
f) What additional supplies are needed in my
next charcoal drawing (if any)
g) What the audience might like about my
charcoal drawings at my next exhibit
ASSIGNMENT THREE CHARCOAL DRAWING :::
DATES FOR START & COMPLETION:
This was assigned on March 12, 2017. The entire assignment should
be turned in & completed on April 15, 2017 target date.
Concert Art Shows
a Saint Pierre Production
In The Cultural Arts
"A Music And Art For Youth Art Assignment"
Concert Art Shows
a Saint Pierre Production
In The Cultural Arts
"A Music And Art For Youth Art Assignment"

The Concert Art Shows are produced by Saint Pierre with the cultural arts in Ventura. Established in 2009, our mission is the convergence of the visual arts & the performing arts together. Our efforts benefit the artists and our fund raising cause: Music And Art For Youth" by helping the needy kids 9- 19 years old .
![]()
![]()
![]()
![]()